|
* TinkerDifferent *
Retro Computing Community |
| Home | Forums | What's New | Search | Settings |
| 3D Printing & MacEffects Appreciation |
Forums > Vintage Apple > Macintosh > Compact Macs
|
JDW Administrator Japan -------- Joined: Sep 2, 2021 Posts: 2,535 Likes: 1,983 |
Jul 23, 2025 - #141
I've been evaluating a 3D printed mount for use with one of those SD card "extenders" so I can easily insert and remove the SD card with the Mac's back housing in place. |
|
caver01 Tinkerer -------- Joined: Oct 30, 2021 Posts: 201 Likes: 144 |
Jul 23, 2025 - #142
Liked by wottleandJDW |
|
wottle Active Tinkerer Fort Mill, SC -------- Joined: Oct 30, 2021 Posts: 841 Likes: 577 |
Jul 23, 2025 - #143
The clear adapter I used extends out makes it very easy to get the full sized SD card in and out. It also has a nice opening that allows for insertion without having to turn the machine around. I'd recommend removing the card If the machine was going to be transported somewhere where it could end up bumping things with its back. Liked by JDW |
|
caver01 Tinkerer -------- Joined: Oct 30, 2021 Posts: 201 Likes: 144 |
Jul 23, 2025 - #144
Thanks for the follow up. That's the kind of hands-on report I needed. I am going to take a look at the model now to see if the holes are good for my threaded inserts and maybe add the four screw holder holes that PotatoFi has on his model. This is just a really convenient place to store the HDD mounting screws if you ever need them again for a future device. As I will be printing mine in clear filament, I will also look for any overhangs that might be worth dealing with.
I just soldered my BS2 kit. It looks nice and solid. Even though I have used V1, I want to take a peek at the docs to see if should do anything special with LEDs. I see there are solder jumper pads for brightness which is pretty awesome. |
|
Garrett Tinkerer South Carolina -------- Joined: Oct 31, 2021 Posts: 144 Likes: 139 |
Jul 23, 2025 - #145
Liked by caver01 |
|
caver01 Tinkerer -------- Joined: Oct 30, 2021 Posts: 201 Likes: 144 |
Jul 23, 2025 - #146
@wottle How well does the back panel fit over your crystal clear BlueSCSI2 mounting bracket? I am comparing the amount it protrudes into the expansion port area and it is almost double the version I have installed in my SE/30 today which sits flush. I have not assembled my MacEffects case yet, so maybe it is thicker, but does yours
|
|
wottle Active Tinkerer Fort Mill, SC -------- Joined: Oct 30, 2021 Posts: 841 Likes: 577 |
Jul 24, 2025 - #147
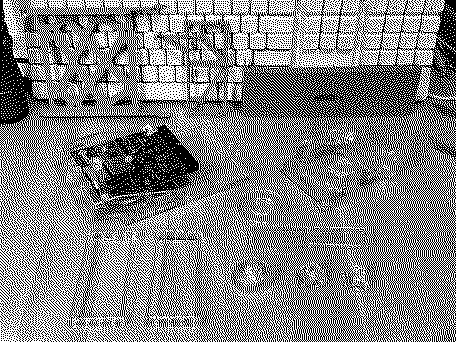
The fit's very nice. I'm not home right now but I feel like the extruding part is nearly flush with the back of the case. [Image: IMG_3899.jpeg] [Image: IMG_3900.jpeg]
Liked by JDW |
|
caver01 Tinkerer -------- Joined: Oct 30, 2021 Posts: 201 Likes: 144 |
Jul 24, 2025 - #148
That's excellent. Thanks for sharing those photos. . . Wow that clear resin version looks really nice. I know you commented on it having a little texture, but this looks way better than mine will look. You can see the PCB right against the "window".
I am printing my bracket now using your model. Much appreciated. I did split it into three pieces instead of just two to avoid overhangs. |
|
wottle Active Tinkerer Fort Mill, SC -------- Joined: Oct 30, 2021 Posts: 841 Likes: 577 |
Jul 25, 2025 - #149
Yeah, my model was more optimized for the resin printing I was planning to do, so it is probably not as good for FDM printers. I also found this model, which looks like it may be better suited for FDM printing. Also, with its thinner outer wall, I wonder if it would look better with the clear resin print. I can't tell which version of the BlueSCSI v2 it was built for, so my guess is I'd need to create a version with different mount locations. I do really like the one I made, so it's not worth it for me to re-print a new mount, but I may see if I can update that print for others that might want to do the same. The cost savings appear to be significant. The one I posted cost ~$15 to print in clear resin, the model linked above only costs ~$6 to print in clear resin. If anyone is interested, let me know and I can try to update the above linked model to have the proper screw mount locations for 2023.10a version of the BlueSCSI v2. |
|
caver01 Tinkerer -------- Joined: Oct 30, 2021 Posts: 201 Likes: 144 |
Jul 25, 2025 - #150
The PCB mounting holes would need to be adjusted as you mentioned, but when I lined up the expansion port screw holes, they are not even close. I don't know how this could have fit an SE chassis at all. I just printed yours and it lined up perfectly. Also, the jonschwenn model has some missing solids. It appears to be modeled with walls first, then a solid block near the chassis mount holes, but the blocks are missing upon import into TinkerCAD. It's another example of STL file breakdown. Maybe it's an easy import/fix/export from Prusa slicer, but the dimensions of those chassis mount holes are a concern. On the plus side, I do like that has no overhangs and should print without supports. There is the bridge over the SD card slot, but a bridge that size should be fine. I also especially like the thin wall facing the back. This will have better transparency with T-Glase or other clear FDM filaments, as it minimizes the number of layer/perimeters that obscure the light. I might play with this since I can print another bracket without much issue. The changes I would make: 1. Fix the mounting holes for the chassis. It just seems out of proportion and needs to be wider. 2. Fix the mounting holes for the latest BlueSCSI PCB. It probably only needs one hole in the middle since the board is already captured side to side. 3. Add a top surface over the SD card slot using 45-degree from the back edge. This will give it a little more back to front depth along the back face so that you don't end up with a gap along that top edge. Liked by wottle |
|
Dave928 Tinkerer Seattle, USA -------- Joined: Sep 17, 2024 Posts: 45 Likes: 33 |
Jul 25, 2025 - #151
PCBWay parts arrived. I really, really like how they turned out.
the parts at the back are for my G3 tower.
Liked by wottle,chuck.dubuque,caver01and 1 other person |
|
JDW Administrator Japan -------- Joined: Sep 2, 2021 Posts: 2,535 Likes: 1,983 |
Aug 1, 2025 - #152
Thanks to Nick Gillard of 1-bit Rainbow for the original STL and huge thanks to @caver01 for having fixed 779 errors and uploaded the newest version STL:
[right] STL DOWNLOAD [left] I now have a beautiful Red PLA printed CRT Yoke Protector from JLC3DP... [Image: tempImageHyTLpc.png] [Image: IMG_7155.jpg] [Image: IMG_7157.jpg] [Image: IMG_7158.jpg] It was a little hard to get on because you have to slightly bend out all 4 legs to slide it down and lock it on, but after 5 minutes I was able to do it. It's PLA but it didn't crack when I slightly bent the legs, probably because I didn't bend them a lot, which made it harder to get on by protected the plastic. This is useful for anyone who does the LCD Retrofit by @zigzagjoe . Protect those CRTs before they go into storage!
Liked by Nitram78andcaver01 |
|
Dave928 Tinkerer Seattle, USA -------- Joined: Sep 17, 2024 Posts: 45 Likes: 33 |
Aug 1, 2025 - #153
if it was difficult to put on, have you tried taking it off?
|
|
wottle Active Tinkerer Fort Mill, SC -------- Joined: Oct 30, 2021 Posts: 841 Likes: 577 |
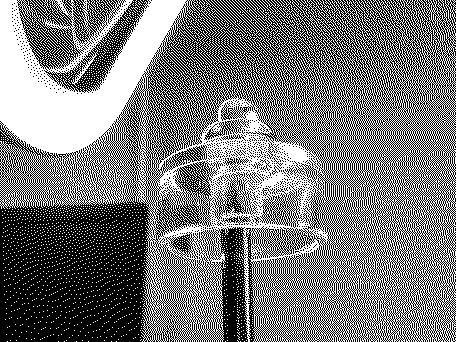
Aug 1, 2025 - #154
I did test all 7 on a spare analog board and it is still a very snug fit (It feels very close to the original part). So I think if you're ordering from JLCPCB in the clear resin, I would use the 6.2 ID version. As you can see in this picture, it sits nicely down on the stem and should work perfectly, versus the original I got that I had to grind down a bit with my Dremel tool. The part went on with a tiny bit of force, and it came off with a little bit of prying, very similar to the original part. Here's a closer look: [Image: IMG_4623.jpeg] [Image: IMG_4622.jpeg] Unfortunately, the "let's see how this works" print of one in metal (the original part, not the larger inner diameter one), seems imposible to get on. I suspect it is a combination of the fact that it is probably completely inflexible and the fact the surface has the feel of 400 grit sandpaper. That said, it ended up a gorgeous print. For small items that are not at risk of conducting electricity, I might start using it more. [Image: IMG_4620.jpeg] [Image: IMG_4621.jpeg] For those still interested, DM me and we can work out the details. I think these seem sturdy enough I may be able to use padded mailers to cut down on shipping cost. The challenge is it is essentially 1" cubed so I don't think I can use a USPS mailer. But hopefully we can get something not too expensive.
Liked by caver01,GarrettandJDW |
|
JDW Administrator Japan -------- Joined: Sep 2, 2021 Posts: 2,535 Likes: 1,983 |
Aug 2, 2025 - #155
Alongside my CRT Protector came all the knobs and another two sets of my Mac SE and SE/30 metal chassis DESK SAVERS. Below are all high resolution photos so be sure to click them to see the detail.
People who want to print the knob (normal inner diameter version or the slightly larger 6.2 version) should grab the download here. At bottom right in the photo below you can also see the stock knob and the replacement POT which can be used on the Dummy Analog board of the LCD Retrofit Kit by @zigzagjoe . [Image: JLC3DPprints.jpg] Here's a zoom of the Desk Savers, with the black being SLS 3201PA-F Nylon and gray being MJF PA12-HP Nylon. Note that the Gray MJF is slightly smoother and less gritty to the touch so I would highly recommend that for people wanting to print these! [Image: DeskSaversZoom.jpg] I printed the Fan Mounting Bracket by @alxlab using FDM PA12-CF (carbon fiber), and it is perfect for use on the @zigzagjoe LCD Retrofit Kit's Dummy Analog board, although it would require you to buy machine screws and nuts, whereas the stock metal bracket only needs the stock machine screws. The carbon fiber should make it stand up well over time despite the vibrations of the fan mounted to it. [Image: FanMountingBracket1.jpg] [Image: FanMountingBracket3.jpg] [Image: FanMountingBracket2.jpg] I printed the standard knob (not the 6.2 version) in TPU just for fun, but it mounts easily on the POT due to its flexibility, although it is only semi-transparent. And sadly, JLC3DP wouldn't process it without the silly brim due to their min. size restrictions, which means if you print it in TPU at JLC, you will need to spend time removing the brim. Should be easy but I've not done it yet. [Image: Knob_TPU.jpg] [Image: Knob_TPU_inside.jpg] I then printed two versions in 100% transparent SLA 8001 resin, one being the standard inner diameter and the other being the 6.2 version. [Image: Knobs_Clear.jpg] [Image: Knobs_Clear_Insider.jpg] Hands down, print the 6.2, not the smaller diameter version STL! Because even the 6.2 didn't slide on as easy as the factory knob does, neither on the factory Analog Board POT, nor on the replacement POT for the @zigzagjoe Dummy Analog Board. Note that in the two photos below, I didn't slide the transparent one on all the way because it's tighter than the factory knob and I knew that sliding it on all the way would mean I would need to fight and riddle to get it off, and I didn't want to do that. I wanted to get my photos edited and uploaded for you folks faster. :) [Image: Knob_Clear_onPOT.jpg] [Image: Knob_Stock_onPOT.jpg] And here's the transparent on the POT for the LCD Retrofit Kit, which I bought separately and is not included with the kit. Because the shaft is shorter, I was able to slide it on all the way and didn't need to worry about fighting to get it off. Again, even the 6.2 is tighter than the factory knob in terms of that inner diameter which fits onto the shaft. [Image: Knob_Clear_onZZJ-POT.jpg] And lastly, here is the knob printed in FDM PA12-CF (carbon fiber). Neither of these wanted to slide on, probably because this filament doesn't print smoothly like resin does, and while TPU doesn't print smoothly either, it's far more flexible. Note the seam on the side that would also need to be cleaned up as well. It would take a lot of work to make the 6.2 fit on, and even then I worry the gritty nature of this print would result in the knob not turning smoothly unless more work was put into making it be very finely sanded down. I don't really want to waste time doing that, so these are just test prints to inform you all that you shouldn't print the knob in PA12-CF. [Image: Knobs_Black.jpg] [Image: Knobs_Black_Inside.jpg] Now, I've not installed these in the Mac yet so I cannot say how easily they turn. Specifically, the little protruding part that sticks out of the knob at the tip and which fits into the back side of the front plastics of the Mac must be smooth in order for the knob to turn smoothly. The TPU will obviously be harder to turn than the resin, but again, I won't know for sure until I've actually put it inside the machine and tested. But for now, I'd say the 100% transparent knob in the 6.2 inner diameter size is the winner, even though it takes more force to push onto the POT's shaft than the stock knob. (Not a lot more force, just a bit more.)
Liked by Dave928andcaver01 |
|
caver01 Tinkerer -------- Joined: Oct 30, 2021 Posts: 201 Likes: 144 |
Aug 2, 2025 - #156
Funny to get excited about a little knob, but those clear ones look great!
Liked by JDW |
|
JDW Administrator Japan -------- Joined: Sep 2, 2021 Posts: 2,535 Likes: 1,983 |
Aug 2, 2025 - #157
The title of this thread is
MacEffects Appreciation PostA lot of folks are missing those important thread because of the title. Please let me know what you all think if I were to rename it: 3D Printing & MacEffects AppreciationLiked by wottle |
|
Dave928 Tinkerer Seattle, USA -------- Joined: Sep 17, 2024 Posts: 45 Likes: 33 |
Aug 2, 2025 - #158
what about "MacEffects Appreciation & 3D printed accessories"
Liked by wottle |
|
JDW Administrator Japan -------- Joined: Sep 2, 2021 Posts: 2,535 Likes: 1,983 |
Aug 2, 2025 - #159
If one feels that to be inappropriate, another option is to move all the 3D printing posts out of this thread into a new thread entitled "3D Printing" or similar, completely divorced from MacEffects topics. Or we just leave things as is, which means people scanning thread titles will likely overlook this thread because the title makes it sound like it is only about people who want to thank MacEffects exclusively. Liked by wottleandDave928 |
|
tom_B Tinkerer Connecticut -------- Joined: Aug 3, 2022 Posts: 40 Likes: 35 |
Aug 5, 2025 - #160
|
| << First | < Prev | Page 8 of 13 | Next > | Last >> |
| Home | Forums | What's New | Search | Bookmarks | RSS | Original | Settings |
| XenForo Retro Proxy by TinkerDifferent.com |
![[Image: IMG_3899.jpeg]](/proxy_image?url=https://tinkerdifferent.com/data/attachments/22/22388-a74251a3a36b7793a9a8ff0cf28e9706.jpg)
![[Image: IMG_3900.jpeg]](/proxy_image?url=https://tinkerdifferent.com/data/attachments/22/22389-15d01f4034659aa6f195ea0e64e56f48.jpg)
![[Image: tempImageHyTLpc.png]](/proxy_image?url=https://tinkerdifferent.com/data/attachments/22/22533-e9da2b93a06b0f84b0531acf85c4a38f.jpg)
![[Image: IMG_7155.jpg]](/proxy_image?url=https://tinkerdifferent.com/data/attachments/22/22536-ff9076a03bbae57487f4b5ef39c3e22c.jpg)
![[Image: IMG_7157.jpg]](/proxy_image?url=https://tinkerdifferent.com/data/attachments/22/22537-b9088aa151b0cd58981b44da075dfce3.jpg)
![[Image: IMG_7158.jpg]](/proxy_image?url=https://tinkerdifferent.com/data/attachments/22/22538-cad3674f4eeb444c460b8f359592cfec.jpg)
![[Image: IMG_4623.jpeg]](/proxy_image?url=https://tinkerdifferent.com/data/attachments/22/22557-b8de495737e9c8e987f8944d2894d416.jpg)
![[Image: IMG_4622.jpeg]](/proxy_image?url=https://tinkerdifferent.com/data/attachments/22/22558-46f893b2b57eaa21d3de114eccf0a877.jpg)
![[Image: IMG_4620.jpeg]](/proxy_image?url=https://tinkerdifferent.com/data/attachments/22/22555-373384153a3de41e296729812cda85f9.jpg)
![[Image: IMG_4621.jpeg]](/proxy_image?url=https://tinkerdifferent.com/data/attachments/22/22556-a80906f2d097624ade387d96d46cb95f.jpg)
![[Image: JLC3DPprints.jpg]](/proxy_image?url=https://tinkerdifferent.com/data/attachments/22/22562-4afc3329159744a4ce3edefceba5e8a2.jpg)
![[Image: DeskSaversZoom.jpg]](/proxy_image?url=https://tinkerdifferent.com/data/attachments/22/22563-a3d61c50cdc503efdf90cfeac6e97673.jpg)
![[Image: FanMountingBracket1.jpg]](/proxy_image?url=https://tinkerdifferent.com/data/attachments/22/22565-5adf701523b81270a63b180688fe7eba.jpg)
![[Image: FanMountingBracket3.jpg]](/proxy_image?url=https://tinkerdifferent.com/data/attachments/22/22566-11b2b2dca95368c43b4f816223714edc.jpg)
![[Image: FanMountingBracket2.jpg]](/proxy_image?url=https://tinkerdifferent.com/data/attachments/22/22567-926577b4b93593ddb91a51b5373b7c99.jpg)
![[Image: Knob_TPU.jpg]](/proxy_image?url=https://tinkerdifferent.com/data/attachments/22/22569-74baa2bb4cf116d47b39cb110bb25f74.jpg)
![[Image: Knob_TPU_inside.jpg]](/proxy_image?url=https://tinkerdifferent.com/data/attachments/22/22570-a0e2bf88183ed66710c601be3a24dfdf.jpg)
![[Image: Knobs_Clear.jpg]](/proxy_image?url=https://tinkerdifferent.com/data/attachments/22/22571-8374be43d66652708e95a3ee2463312a.jpg)
![[Image: Knobs_Clear_Insider.jpg]](/proxy_image?url=https://tinkerdifferent.com/data/attachments/22/22572-da8340001ddc6edc48b943f84e6d2ff8.jpg)
![[Image: Knob_Clear_onPOT.jpg]](/proxy_image?url=https://tinkerdifferent.com/data/attachments/22/22573-6ecc3beeeeda7aba9cfd74f6dfad189c.jpg)
![[Image: Knob_Stock_onPOT.jpg]](/proxy_image?url=https://tinkerdifferent.com/data/attachments/22/22575-c128d59535c05ac0d2c91270e1d7d0be.jpg)
![[Image: Knob_Clear_onZZJ-POT.jpg]](/proxy_image?url=https://tinkerdifferent.com/data/attachments/22/22574-2592cbce7c7fc130505e0c5a343cf5e8.jpg)
![[Image: Knobs_Black.jpg]](/proxy_image?url=https://tinkerdifferent.com/data/attachments/22/22577-849735ca9454593be6843d6fd122bae8.jpg)
![[Image: Knobs_Black_Inside.jpg]](/proxy_image?url=https://tinkerdifferent.com/data/attachments/22/22576-7875c985052c84e9276f2ccb978b4f72.jpg)