|
* TinkerDifferent *
Retro Computing Community |
| Home | Forums | What's New | Search | Settings |
| Using the Sun to restore a yellow Macintosh [black-sun-with-rays] |
Forums > Vintage Apple > Macintosh > Compact Macs
|
-------- |
Jan 22, 2022
I've been looking at the safest ways to restore the color of the Mac without over bleaching the unit or leaving streak marks.
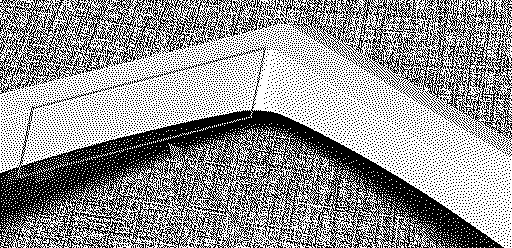
Because the inside of a Mac 128/512/Plus is coated with a conductive covering, I want to avoid submerging the case into hydrogen peroxide as it induces rusting/oxidation. I also want to avoid buying gallons of hydrogen peroxide. The two methods I tried were using just the sun (nothing else!), and a hydrogen peroxide cream. Here is a before/after gif of a platinum bezel using the two methods. Results OverviewAs seen in the gif, the center bezel is before and after. The bezel was place between a lightly yellowed bezel on the left and a heavily yellowed bezel on the right just for reference.The sun was able to restore the color to a modestly yellowed state. The creme did a much better job and was able to restore the color to a very slight yellowed state. I was impressed with both results in general Please note that the cream did NOT over brighten the bezel! From the area under the logo, you can see that the original color was even brighter. On the negative side for the cream. the bezel color was not evenly restored. On the left side of the inward CRT bend, there's extra yellowing, as highlighted in the image below. This is partially because it's difficult to get all the edges an equal amount of sun in such a short amount of time. Sun MethodBezel was placed outside in the sun, in the middle of January, every day between 11am and 4pm (I get limit sun due to surrounding buildings). 2 of the days were sunny and 3 days were cloudy. Temperature was cold, about 6*C/43*F every day. I did check on it everyday and on cloudy days the bezel would get brighter as well. I would place the bezel at slightly different angles every day to ensure all edges got some sun. Only the top side came out a bit darker, but this can be easily fixed by placing it at an angle to focus on top side.Below is an image of 4 Mac Plus platinum bezels. From left to right: 1. Original Color 2. Brightened via cream, original color can be seen where the logo was removed. 3. Brightened via sun for 5 days 4. Heavily yellowed bezel (right side bezel from above gifs) Lastly, I'd like to note that the 5 days of sun had no visible affect or discoloration on the badge, however I'm sure that if I did leave it out for a couple weeks it would. Cream MethodI followed the method described in this youtube video.Recipe (note this makes enough to do at least 5 macs!!):
ConclusionThe sun did a surprisingly really good job! However it seems you'd probably need to leave it out in the sun for a month if you'd like to remove most of the yellowing.The cream also did a great job, but it can be hard to get even results on a heavily yellowed bezel. My final suggestion would be to leave the case out for 1~2 weeks in the sun, and then follow up with a 1 hour cream treatment to get that extra final mile. Liked by davewongillies,JDW,baileyand 17 others |
|
davewongillies Tinkerer CA, USA -------- Joined: Nov 2, 2021 Posts: 45 Likes: 50 |
Mar 20, 2024 - #101
Inspired by this post I gave the sunlight method a go with an SE/30 I just got. This is before and after 2 days in the Sun (there's been some pretty good sunny days here in the Bay Area recently)
Liked by AndyDiags,Kai Robinson,JeffCand 1 other person |
|
JeffC Tinkerer Seattle, WA -------- Joined: Sep 26, 2021 Posts: 137 Likes: 88 |
Mar 20, 2024 - #102
How did you ensure the sides got even sun? Did you rotate throughout the day? |
|
davewongillies Tinkerer CA, USA -------- Joined: Nov 2, 2021 Posts: 45 Likes: 50 |
Mar 20, 2024 - #103
There was a bit of reflected light in the after photo but there is a slight outline from the badge. If I casually glance at the case I can barely notice it. Given that there's been no chemicals involved in this process I'm more than happy with how it is.
I did move it around a bit but nothing too scientific. Also the sides of the face plate weren't as yellow as the front which made the process easier.
|
|
JeffC Tinkerer Seattle, WA -------- Joined: Sep 26, 2021 Posts: 137 Likes: 88 |
Mar 20, 2024 - #104
|
|
JDW Administrator Japan -------- Joined: Sep 2, 2021 Posts: 2,534 Likes: 1,982 |
Mar 21, 2024 - #105
Sorry for replying to an old post, but I've not posted in this thread in a long while and I only finished reading all the pages of this thread today. I wanted to point out that "rkauer" stated that he is using "a flask of 40% H2O2." Forty percent is an extreme concentration that I cannot buy here in Japan, and no doubt other people outside the US would be equally restricted. As a result, I have only used 3% H202 liquid mixed with Oxiclean, often with water added by me because I never buy enough bottles of H202 when I submerge something. I never use indoor lamps. I always do it outside under the sun during the summer months, as that yields both UV light and heat. I also use the same 3% H202 to create a gel form. Check out my photos on Flickr here: And be sure to click on me in the Apple T-shirt and check the text description under that photo for the gel recipe I used. All said, I only use 3% because that's what I can buy, but I'm pleased at the result it gives me.
|
|
JDW Administrator Japan -------- Joined: Sep 2, 2021 Posts: 2,534 Likes: 1,982 |
Mar 21, 2024 - #106
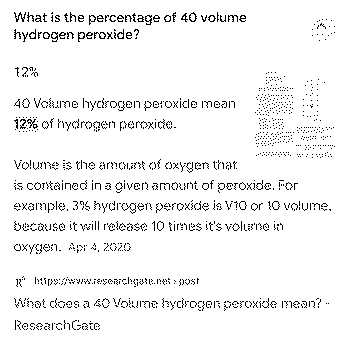
Check this out: Gargling hydrogen peroxide: Uses, benefits, and safetyHydrogen peroxide has many antiseptic and antibacterial properties, and it is a staple in many medicine cabinets. Learn about the benefits of gargling with hydrogen peroxide here.
[Image: www.medicalnewstoday.com]
www.medicalnewstoday.com
And yes, I've diluted my 3% stuff in a little water and gargled with it in the past. Would I do that with hair bleaching cream or 40% liquid H202? Absolutely not. So we need to define our terms clearly. Again, not a chastisement. Just an observation and clarification.
Liked by Nycturne |
|
JDW Administrator Japan -------- Joined: Sep 2, 2021 Posts: 2,534 Likes: 1,982 |
Mar 21, 2024 - #107
Now as to SunBright or whatever the H202-free method is called, I tried it after seeing Perifractic try it on his Retro Recipes YouTube channel. It did not yield great results for me, and on my HD20 enclosure, I was hard pressed to see any improvement at all, even after 4 days in direct sun, all day for as long as the sun was in the sky.
The main reason I tried it is because I've had the best success with dunking in the liquid form of RetroBright. But dunking takes a lot of H202 bottles, and even then I always add water (which dilutes the H202 concentration). As others have stated, it is costly and generates a lot of waste. And so, my hope was to see the sun working some magic. Sure, I've seen the photos the rest of you have posted. And I honestly can't explain why some of you get such great results. Yes, I clean my plastics with 100% IPA before deyellowing, so that's not the issue in my case. In the end, what matters is the result YOU get, or in my case, the result I get. And like I said, I wasn't satisfied with the result of using the SUN ALONE. So I have a lot of RetroBright projects to do. They pile up fast. Maybe I'll tackle some this summer, either with my gel recipe (which does NOT use plastic wrap, but requires a lot of pain and effort because I must keep making it and reapplying it throughout the entire day), or with my liquid 3% form. |
|
davewongillies Tinkerer CA, USA -------- Joined: Nov 2, 2021 Posts: 45 Likes: 50 |
Mar 21, 2024 - #108
|
|
KennyPowers Active Tinkerer -------- Joined: Jun 27, 2022 Posts: 323 Likes: 360 |
Mar 21, 2024 - #109
Liked by JDW |
|
JdM74 Tinkerer Georgetown TX -------- Joined: Jan 16, 2024 Posts: 40 Likes: 43 |
Mar 22, 2024 - #110
Retrobright - a far, wide-ranging and interesting topic...with people out there who have differing methods and opinions on how it should be done. JDW put it best, "In the end, what matters is the result YOU get, or in my case, the result I get". With that said, some go for the 'chemical free' method of using the sun -- which is fine, if you're in a place where the sun is consistent. Some go for the 'in the soup' method -- the one I use, using SalonCare 40, distilled water, UV lamps and a seedling warming pad. Others go for the 'paint and wrap method' -- use cream developer of some varying strength with a mix of things and use plastic wrap. There are other derivations of this process -- many videos, write ups, etc. out there in the universe about it.
I gotta reiterate what JDW said, "In the end, what matters is the result YOU get". Before I even put one red cent towards any supplies or even cracking the case on any one of the precious items in my collection, I did A LOT of research. Read all the differing opinions [everything from the original forms of this, to using the sun and just about everything in between that I could lay my hands on]. After all that, I ended up settling on the 'in the soup method'. Not as someone suggested 'being lazy'...but because the weather in the Lone Star state isn't always consistent and I wanted consistent and reproducible results. The 'paint and wrap' method did not appeal to me, since I saw very mixed results...some going to the point of ruining a 30+ year piece of equipment. It was pointed out that there is expense and waste generated from using the 'in the soup method'. That's true and there's waste generated from other methods...but consider this. Since putting my tanks [two of them, one for larger items and the other for Compact Macs]...I've retrobrighted 16 things: Mac Plus x3 Macintosh IIci x2 Macintosh SE/30 x2 Macintosh IIsi Power Macintosh 6100/66 [which sucked, because the case was made of REAL cheap plastics back in the day] Hard Disk 20SC enclosure Apple Extended Keyboard II Apple IIgs x3 [plus 2 keyboards and mice] ...with a several more pieces to go...all on the solution I put together when I started this little endeavor. One thing I forgot to add -- all of what's been done thus far ranged from expected discoloration to something that looked as if it had been a 2-pack a day smoker's house that was never aired out for 30 years. What NO ONE would ever answer, what the right mix of things was supposed to be, how long to cook things for and temperature to keep things cooking rightly. Again...LOTS of differing opinions and thoughts. So, had to figure that all out -- 1 gallon SalonCare 40 + 1 gallon distilled water = 6% solution. Five gallons of each yielded me what I needed to do the work at hand. The other thing, was how long to keep things 'in the soup'. With this mix of solution, 24 hours under 2-200 watt and a string of 60 watt UV lamps and the solution kept between 80 and 90*F [for those metric folks 26 and 32*C ] yielded the consistent and reproducible results I wanted and needed. One last final addition to this mix...after everything was removed, rinsed with warm water and air dried...applied a light coating Renaissance Wax [a little goes a LONG way with this stuff]. If museums trust in this to preserve things way older than our 30-year old computers...might be something in it. I figured, if I spent all this time cleaning stuff up...best to do everything to slow the re-aging process down a bit. If it were only that easy for us mere mortals. :D There was some talk about keys floating in the 'soup' method. I had that happen...keys upside down, some at the bottom of the tank....and in the end...back to their original color...consistently. The spacebars though did pose a bit of a challenge -- since for whatever reason, those are sometimes made of a different plastic than the keys themselves. Something was called out about using glass during the process. I have used a large Pyrex measuring cup to hold Compact Mac bezels down [since they had a tendency to tilt upward and to put other bits and bobs in]. No streaking, marbling or unanticipated discoloration. I'm sure if you put glass in direct sunlight...that might just happen. With all this said, the opinions here are mine and mine alone....and I don't wanna get into any arguments with folks saying "they're right and I'm wrong". I go back once again to JDW's line -- "In the end, what matters is the result YOU get, or in my case, the result I get". Retrobright with pleasure...bringing our Vintage computers back to their original glory. Do so...after doing good research and coming to the right decision for you. |
|
padcrafting New Tinkerer Houston, TX -------- Joined: Mar 24, 2024 Posts: 16 Likes: 2 |
Apr 10, 2024 - #111
|
| << First | < Prev | Page 6 of 6 |
| Home | Forums | What's New | Search | Bookmarks | RSS | Original | Settings |
| XenForo Retro Proxy by TinkerDifferent.com |
![[Image: www.flickr.com]](/proxy_image?url=https://live.staticflickr.com/3521/3825168855_53d4885e58_b.jpg)
![[Image: www.medicalnewstoday.com]](/proxy_image?url=https://media.post.rvohealth.io/wp-content/uploads/sites/3/2020/02/324121_2200-1200x628.jpg)
![[Image: www.medicalnewstoday.com]](/proxy_image?url=https://media.post.rvohealth.io/wp-content/uploads/2023/11/MNT-Periwinkle-White.png)