|
* TinkerDifferent *
Retro Computing Community |
| Home | Forums | What's New | Search | Settings |
| How to: Build an External Power Supply for Atari 520ST (Using Parts from Amazon US) |
Forums > Vintage Atari > Atari ST Line
|
Hurry Tinkerer -------- Joined: Oct 28, 2021 Posts: 48 Likes: 35 |
Apr 29, 2022 - #1
This article will detail the steps for building an external power supply for an early model Atari 520ST. There are ways to improve this build with better connectors, and I plan to design and print a 3D printed case for the final product in a future revision. Cases for Amiga power supplies that use similar builds are available on Thingiverse - but unlike the Amiga, the Atari ST doesn't require a power switch on the PSU. I plan to omit the switch on my 3D print design.
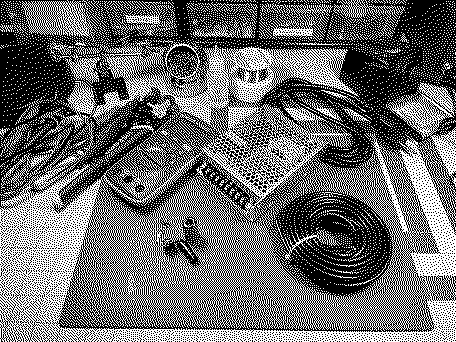
Materials Required
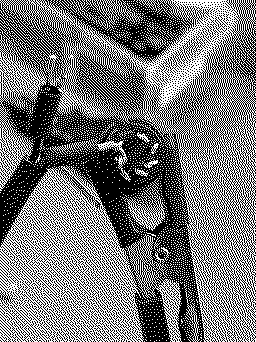
Step One Cut the female end from your C13/C14 cable. Expose the three wires and tin (better than I did, ideally). Step Two Attach your wires as follows (left to right):
Plug the power supply in and verify your voltages.
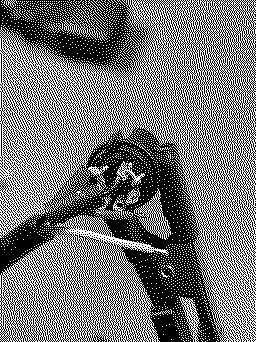
Cut the four conductor cable to length (I cut it to be as long as the C13/C14 side). Cut and strip both ends, the conductor wires, and tin. For the purposes of this tutorial we will assign the colors as follows:
Consult the diagram above When you start to solder wires to the DIN connector, remember that the diagram is oriented as though you are facing the back of the computer, not the front of the DIN connector. Remember to add your heat shrink tubing before you begin to solder. Step Seven Bridge the two +5VDC pins with the yellow wire and solder into place. Step Eight Bridge the two Ground pins with the black wire and solder into place Step Nine Solder Red to +12VDC Step Ten Solder White to -12VDC Step Eleven Attach the other end of the cable's conductors to the Power Supply as follows (Left to Right):
Step Twelve Plug in your power supply and test voltage at the DIN connector to ensure you have continuity and the correct voltage on each pin. Step Thirteen Heat your heat shrink or coat the back of your DIN connector in hot glue if you're a savage :) (I suppose a savage wouldn't bother with either... if you are a gentle savage use hot glue) Step Fourteen Assemble the DIN connector Step Fifteen Test!
Liked by OneGeekArmy,jdmcsandKai Robinson |
|
Kai Robinson TinkerDifferent Board President 2023 Worthing, UK -------- Joined: Sep 2, 2021 Posts: 1,322 Likes: 1,313 |
May 23, 2022 - #2
Gotta say, i really love the RT-65B - i made a bench supply for testing SE & SE30 logic boards, using one of those. Still keep meaning to get another one to shove into the original Amiga power brick.
|
|
Hurry Tinkerer -------- Joined: Oct 28, 2021 Posts: 48 Likes: 35 |
May 24, 2022 - #3
Liked by KingDingus |
|
rainwarrior New Tinkerer Ontario, Canada -------- Joined: Jun 28, 2025 Posts: 1 Likes: 0 |
Jun 28, 2025 - #4
I made a similar one from an ATX power supply a few years back, but I couldn't find a good DIN connector at the time, sorta had to jury rig something that fit... good to know that they're maybe easier to source now.
|
|
jdmcs TinkerDifferent Board DoP&G Central Virginia -------- Joined: Oct 28, 2021 Posts: 112 Likes: 75 |
Aug 12, 2025 - #5
DOS Fox told me that the Cisco 34-0874-01 power brick is another candidate for making an Atari 520ST power supply. Might be good to keep in mind if you have friends in IT, or if you have access to a cheap source.
It's rated for 3A @ 5V, 2A @ 12V, 0.2A @ -12V, and a maximum of 30W. This is higher than the original 520ST power adapter's specifications. |
| Page 1 of 1 |
| Home | Forums | What's New | Search | Bookmarks | RSS | Original | Settings |
| XenForo Retro Proxy by TinkerDifferent.com |