|
* TinkerDifferent *
Retro Computing Community |
| Home | Forums | What's New | Search | Settings |
| BlueSCSI 1.1a Expansion Slot Bracket for SE and SE/30 |
Forums > The Lab > 3D Printing
|
PotatoFi Active Tinkerer -------- Joined: Oct 18, 2021 Posts: 181 Likes: 372 |
Mar 10, 2022 - #1
Hey TinkerDifferent!
I'm very excited to finally release my latest printed bracket design, which mounts the BlueSCSI 1.1a in the Expansion Slot on a Macintosh SE or SE/30! The main goal of this bracket is to make the microSD card as easily accessible as possible, while keeping your Mac fully "enclosed" (e.g. with no obvious holes in it). The microSD card "sticks out" as much as possible while maintaining a 0.8 mm wall (which is about the thinnest that you can go with a 0.4 mm nozzle). Because of the recess of the Macintosh SE bracket in the case, it's still not super easy to get the microSD card out. I can work it out with one finger on each side, but tweezers do make it a lot easier. Reinstalling it is a snap - I have no trouble installing the microSD card with my bare hands. An ejector-style microSD slot might help this, if you're building your own BlueSCSI for this application. Also features: Flush fit: This printed bracket sits flush with the face of the Macintosh SE bracket for a clean look. LED Light pipe: Very useful for troubleshooting microSD card and image issues. The light pipe uses a simple press fit. In a well-lit room, the red LED is pretty dim, but the green LED is nice and bright. I also made the lens on the light pipe the exact same size as the activity LED lens on the front of the Macintosh SE. It's all about the details! Blink code indicators: What does 3 blinks mean?! The glyphs on the bracket tell you what you need to know. Extra hard drive screw storage: When you remove your old failing SCSI hard drive to replace it with a BlueSCSI, you can attach the screws to this bracket. That way, when you stumble on an Asante Maccon Ethernet card, or maybe a Micron Xceed videocard (heavy breathing), you'll have the original hard drive screws waiting and ready to move your BlueSCSI to the hard drive bay. M3 nuts slotted into the bracket! M3 nuts inside the bracket mean you can snug the M3 screws down nice and snugly. Yeah... that's not going anywhere. Potato: It has a potato on it. There are two ways for you to get one! If you have a 3D printer, and want to take a crack at printing your own, you can grab the files, instructions, and hardware list from Prusa Printers. If you don't have a printer, you can buy one from my Etsy shop, and it will include all of the hardware. If it's not in stock, check back in a day or two. 100 percent of the proceeds go towards keeping the 3D printers fed, and additions to my retro Macintosh collection (I can stop whenever I want, right? Right?). But seriously - I love making stuff, and getting to connect with other vintage Macintosh enthusiasts. Massive thanks to the BlueSCSI team for creating an affordable, reliable, performant solid-state SCSI hard disk replacement! Expect to see at least one more BlueSCSI-related part soon.
Liked by rdmark,pfuentes69,Kai Robinsonand 7 others |
|
Drake TinkerDifferent Board Vice-President 2023 -------- Joined: Sep 23, 2021 Posts: 449 Likes: 788 |
Mar 10, 2022 - #2
Wowee kazowee! Gadzooks!
You did a good job on this one, I'm proud of you son :) Good potato [potato] Liked by PotatoFi |
|
wottle Active Tinkerer Fort Mill, SC -------- Joined: Oct 30, 2021 Posts: 841 Likes: 577 |
Mar 11, 2022 - #3
Really love this design. Is there a reason you didn't make the opening a bit larger for the microSD card?
Maybe my printer is printing a bit small. but I need to use pliers to get the SD car because it's so tight of a fit. I like the look, but it feels like the SD card opening could be twice as tall and 20% wider and it would still look great, but have more wiggle room for the SD card to be held in just by the SD card slot on the BlueSCSI. Just some thoughts. I'll probably throw it into MeshMixer and see if I can make the opening a bit larger. |
|
PotatoFi Active Tinkerer -------- Joined: Oct 18, 2021 Posts: 181 Likes: 372 |
Mar 11, 2022 - #4
Hmmm... I can't say I've run into any fitment issues with the microSD card. On my pair of Prusa MK3S printers, the microSD card doesn't touch the printed bracket during or after installation - the card is held in exclusively by the microSD slot. Is there a specific side that the microSD card touches on, or is it all sides? Liked by wottle |
|
wottle Active Tinkerer Fort Mill, SC -------- Joined: Oct 30, 2021 Posts: 841 Likes: 577 |
Mar 11, 2022 - #5
It's likely an issue with my printer. My supports didn't come off cleanly and there was some left over supports on the bottom which pushed the board up as a slight angle. and there may have been some left over supports on the bottom edge of the top of the opening. So the card was rubbing against the top. I took a razor to it and removed a bit of material and it's moving freely now. Also had a hard time getting the nuts into the slots, making me think my printer may be printing things a bit undersized.
|
|
caver01 Tinkerer -------- Joined: Oct 30, 2021 Posts: 201 Likes: 144 |
Mar 11, 2022 - #6
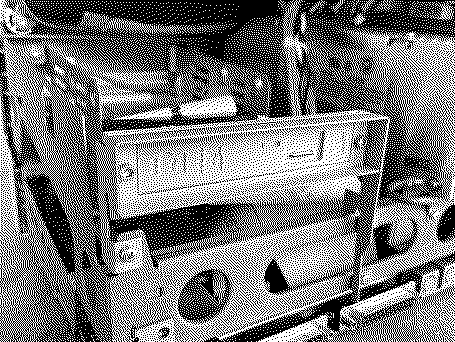
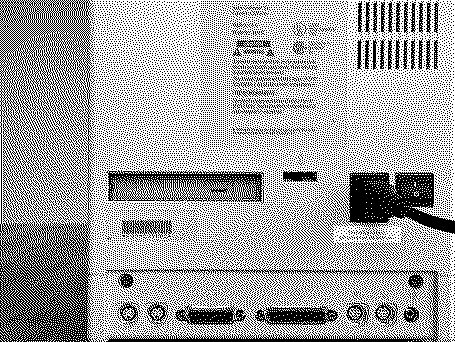
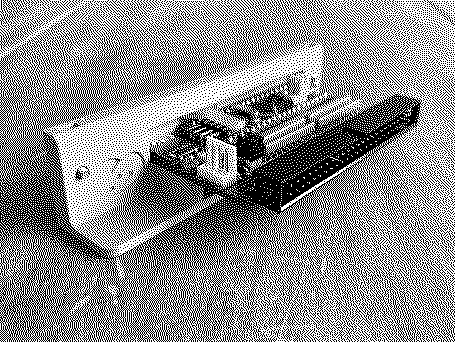
Hey @PotatoFi what do you think of this:
[Image: 4C2F3F0C-5EF0-4265-B116-C77226C454A1.jpeg][Image: B0FDF838-153A-4B15-AEBE-AFEF507BEFFF.jpeg][Image: FFA6CAC0-5406-44BC-BE08-C61D30791574.jpeg][Image: 0D7234AB-E1F9-4748-8934-A7D3D56486CF.jpeg] For a while now I have been playing with your designs, making adjustments for different versions etc. but I started thinking about reverse mounting. . . instead of securing it from the inside, I pushed this through from the back and the screws go in from behind! Of course, this results in a flush-mount. My first iteration had plenty of horizontal tolerance so I tightened it up a bit. The card itself is still really hard to grab, but at least it is not recessed that extra half inch. I don't have the light pipe installed yet. If you are interested, I can share the STL file--I am just messing around in TinkerCAD. The main points are:
|
|
caver01 Tinkerer -------- Joined: Oct 30, 2021 Posts: 201 Likes: 144 |
Mar 12, 2022 - #7
Hey, @PotatoFi I am looking at your item on the Prusa site and I believe I misinterpreted the "remix" marker at the bottom. It says "remix culture allowed" but of course, the bullet next to those line items is an "x" which, unless you are looking at others where it is a "[heavy-check-mark]" it just looked like a list. Sorry about that. I won't post my variations, as I certainly don't want to undercut your Etsy store or rob you of design credit. Maybe just take the above as some possible feedback for a future version?
By the way, I finally did setup the light pipe. I used something like 12 perimeters to get the filament to run parallel lines on every layer and I gotta say, it's really bright. |
|
PotatoFi Active Tinkerer -------- Joined: Oct 18, 2021 Posts: 181 Likes: 372 |
Mar 26, 2022 - #8
Heads up! There were some minor fitment issues with the original 1.0 release, so I have released version 1.1 which makes some minor fitment improvements.
Interesting take on the design, @caver01! It's great to see other ideas. Perhaps this is something to explore in the future, as the one thing about this design is that the microSD card is buried a bit too far in there. Also, I appreciate how you handled the license issue. Your respect to the license is very, very much appreciated. Also - nice Prusa MINI! I have two, and I love 'em! Liked by wottle |
| Page 1 of 1 |
| Home | Forums | What's New | Search | Bookmarks | RSS | Original | Settings |
| XenForo Retro Proxy by TinkerDifferent.com |
![[Image: 4C2F3F0C-5EF0-4265-B116-C77226C454A1.jpeg]](/proxy_image?url=https://tinkerdifferent.com/data/attachments/3/3519-ecc9994700a097f1d046d13fb8e27b3c.jpg)
![[Image: B0FDF838-153A-4B15-AEBE-AFEF507BEFFF.jpeg]](/proxy_image?url=https://tinkerdifferent.com/data/attachments/3/3520-d94f236e464998a4afb659dbe74af8ab.jpg)
![[Image: FFA6CAC0-5406-44BC-BE08-C61D30791574.jpeg]](/proxy_image?url=https://tinkerdifferent.com/data/attachments/3/3523-0350a620919ea49deb886c4f24feca30.jpg)
![[Image: 0D7234AB-E1F9-4748-8934-A7D3D56486CF.jpeg]](/proxy_image?url=https://tinkerdifferent.com/data/attachments/3/3534-63b073b52dc7e9b2465f051ad22457a3.jpg)