|
* TinkerDifferent *
Retro Computing Community |
| Home | Forums | What's New | Search | Settings |
| Assembling a Lisa |
Forums > Vintage Apple > Lisa & Macintosh XL
|
Adam Tinkerer -------- Joined: Oct 22, 2021 Posts: 38 Likes: 53 |
Dec 5, 2021 - #1
This week I'm going to put together a Lisa that I've had apart for some time while testing hardware. It should be fun to clean up the parts and get it all together again. I'll post here as I make progress.
Liked by KingDingus,Patrick,adzq88and 5 others |
|
Adam Tinkerer -------- Joined: Oct 22, 2021 Posts: 38 Likes: 53 |
Dec 6, 2021 - #2
Some of these parts are quite dirty. This Lisa was in a junk pile for a long time. But it seems like it should clean up alright.
|
|
Adam Tinkerer -------- Joined: Oct 22, 2021 Posts: 38 Likes: 53 |
Dec 6, 2021 - #3
However, some of the parts are really yellowed, like this front bottom panel. I think I'll need to retrobright this eventually.
|
|
Adam Tinkerer -------- Joined: Oct 22, 2021 Posts: 38 Likes: 53 |
Dec 6, 2021 - #4
The bottom pieces have been reattached!
|
|
Adam Tinkerer -------- Joined: Oct 22, 2021 Posts: 38 Likes: 53 |
Dec 6, 2021 - #5
Lid attached. This one is easy - just two captive screws underneath in the back.
|
|
Adam Tinkerer -------- Joined: Oct 22, 2021 Posts: 38 Likes: 53 |
Dec 6, 2021 - #6
Oops. I realized that the sides have to go on first. These are a pain, because it's hard to reach the screw holes. I had to use a right-angle screwdriver for one of the screws.
|
|
Adam Tinkerer -------- Joined: Oct 22, 2021 Posts: 38 Likes: 53 |
Dec 6, 2021 - #7
Okay, got the other side on. And the lid is back in place.
|
|
Adam Tinkerer -------- Joined: Oct 22, 2021 Posts: 38 Likes: 53 |
Dec 6, 2021 - #8
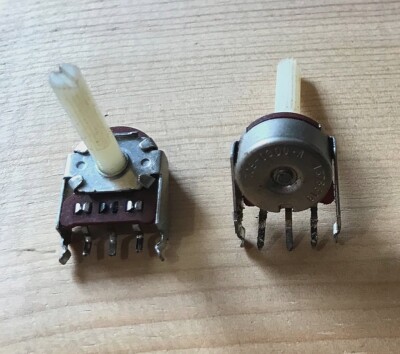
Here's the power supply. There's no need to test it, because someone already did it for me! :D
I've installed it into the Lisa. Unfortunately, one of the knobs is broken on this one. Anyone know a source for these pots?
Liked by KingDingus |
|
Adam Tinkerer -------- Joined: Oct 22, 2021 Posts: 38 Likes: 53 |
Dec 6, 2021 - #9
I've installed the boards (more on those later), and reattached the rather grubby looking back panel.
|
|
Adam Tinkerer -------- Joined: Oct 22, 2021 Posts: 38 Likes: 53 |
Dec 6, 2021 - #10
I'm going to try turning it on and see what happens. I had to take the lid off (again!) because the vertical hold needed adjusting. But the computer is starting up! (I had to trick the front panel switch to make it start without the bezel in place.)
I have to come back to this later. So stay tuned for more!
Liked by ried,rjkucia,Elemenohand 3 others |
|
ScutBoy Administrator Northfield, MN USA -------- Joined: Sep 2, 2021 Posts: 356 Likes: 342 |
Dec 6, 2021 - #11
That's a very good sign!
|
|
Adam Tinkerer -------- Joined: Oct 22, 2021 Posts: 38 Likes: 53 |
Dec 7, 2021 - #12
I had to stop working on this for now, because the power supply has stopped working. I've got replacement caps on order!
|
|
ScutBoy Administrator Northfield, MN USA -------- Joined: Sep 2, 2021 Posts: 356 Likes: 342 |
Dec 7, 2021 - #13
Is this the 1.8 or 1.2 power supply? Will be interested to hear how your Bill of Materials matches up; I need to do this work on my Lisa
|
|
Purdy New Tinkerer -------- Joined: Oct 28, 2021 Posts: 18 Likes: 20 |
Dec 9, 2021 - #14
Yes, please share your BOM for caps on a 1.8A Lisa PS. I've got one that's due for a recap.
|
|
Adam Tinkerer -------- Joined: Oct 22, 2021 Posts: 38 Likes: 53 |
Dec 19, 2021 - #15
I'm stuck on the power supply. The pins on the rectifier were shorted so I ordered a replacement. But when I removed it, the pins are no longer shorted. It appears that the transformer on the left has a short? I'm not sure what to do next. Am I screwed here?
|
|
Markintosh New Tinkerer USA -------- Joined: Mar 31, 2023 Posts: 59 Likes: 18 |
Jul 14, 2023 - #16
Keep us posted! Here's a link to Trim Pots:
Apple Lisa Power Supply Video Trim Pots - Work - Replace Your Bad Ones | eBayRelatively Easy to Install. You must desolder the old one and install(solder) the new one.
www.ebay.com
Liked by JDW |
| Page 1 of 1 |
| Home | Forums | What's New | Search | Bookmarks | RSS | Original | Settings |
| XenForo Retro Proxy by TinkerDifferent.com |
![[Image: www.ebay.com]](/proxy_image?url=https://i.ebayimg.com/images/g/ZjMAAOSw-spkOdeq/s-l400.jpg)